
Build Your Own: Automotive Head Unit
PURPOSE:
When my Jeep’s radio was stolen, replacement options were fairly expensive and I saw this as an opportunity to further modify the vehicle. I ultimately decided to install a Nexus 7 tablet as the head unit due to the fact that I had one on hand and Timur’s kernel provided a variety of useful features that made implementation possible. The mod took me a while to work out at the time, but it is pretty simple to implement and I updated this guide in Jan 2022 to make the content more accessible.
Commentary - 08/2022
For those who are seriously considering using a tablet as a headunit, I’d like to provide you with a disclaimer to let you know that I have since replaced my DIY solution with a modern off-the-shelf headunit. The Nexus 7 approach had some annoying issues like blasting the radio at power on or not being able to effectively charge its ancient battery and dieing when I was enjoying it the most. Sure, these problems can be solved, but why bother? I ended up purchasing an Atoto S8 from Amazon for less than the price of my setup as a replacement. It has a smaller form factor, there is less to maintain, and it has more features. Welcome to 2022. The modern tech is really a better solution and I don’t advise that you build your own headunit from a tablet. But you DIYers go on and do your thing if that’s what you enjoy - I had fun until I didn’t.
Introduction
The automotive head unit is the interface for the infotainment system of a vehicle and is often a prime target for theft due to retained aftermarket value. In older vehicles, it was primarily the stereo. In newer vehicles, it has transformed into a multi-functional touch screen interface for audio, navigation, vehicle diagnostics, rearview cameras, and even portals for an Android or Apple phone.
Security features have been implemented in some units that make them not worth stealing such as detachable face plates (stereo rendered inoperable and therefore unsellable) or complex integration with a vehicle (rendering the system useless in a different vehicle). These features, in addition to other technologies such as universal phone pairing, have supposedly resulted in a decline of stereo theft. Obviously, as I can comment firsthand, theft still exists.
If you are in the market for a new head unit, there are plenty of nice (or budget) commercial systems available and there are also DIY options available which can give you a high degree of customizability at a competitive price. If a DIY system interests you, I would recommend that you familiarize yourself with what options are available. What I have written here is a single build and, given that technology is always advancing, it could be obsolete by tomorrow. That being said, this will still be decades better than some stock units. The following guide is written with sufficient detail that anyone with a TJ Wrangler will be able to follow the guide and end with identical results. Owners of different vehicles may require a few modifications.
What we’re building here is a system with many of the conveniences of modern vehicles in a technologically challenged vehicle:
- Touch screen interface (Nexus 7, 2013)
- Built-in navigation (Nexus 7, 2013)
- Android Auto + Apple CarPlay integration (hardware dongle)
- Stereo integration (Stereo preamplifier)
- FM radio (Software defined radio tuner app + hardware receiver)
- Backup camera (Software app + camera hardware)
- OBDII Interface (Software app + OBDII module)
- Microphone
For those who are fortunate enough to still have their stereos, beware. They can go at any time!

Build Guide
I have decided to reorganize this page to match the natural workflow of setting up the head unit. The first section will focus on setting up the software and the second section will focus on the hardware. At the start of each section, I’ll outline what to expect, followed by the parts/modules used, and then the actual guide. Feel free to consult the associated Youtube videos if you want more visual approach.
Software
Before you can use the Nexus 7 as a head unit, you have to make sure that it’s configured correctly because it is difficult to access once installed. The first thing we’ll do is flash Timur’s kernel on the system, which gives the Android OS some convenient features that the native OS does not have. After the OS is installed, we’ll install relevant apps and change some system settings.
Warning: I am providing software files that I used in my build, but you shouldn’t trust random files that someone uploads on the internet. I don’t think they contain malware, but they could. Download files from the source when possible.
Required Modules
If you visit Timur’s Kernel on Reddit, these are the modules that he requires you to install.
- MOB30X base image (I use Nexus Root Toolkit)
- TWRP 3.0.2
- Timur’s Kernel
- SuperSU v2.76
Files
Optional Modules
These are apps that I use. Items marked with an asterisk (*) are particularly useful.
- Car Launcher Free*
- Files by Google*
- SDR Touch*
- SDR Driver*
- Volume Notification*
- Spotify*
- Reboot to Recovery*
- Shutdown*
- VCam2
- Google Translate
- Google Play Services
- Torque Lite
- Automate
- Automate Superuser Permissions
Car Launcher: This is the main interface for the dashboard. It’s convenient in that it makes a few apps easily accessible, makes it easy to control your music player of choice, has a clean screensaver, and allows for background color adjustment to match your preferences.
Files by Google: This is the file manager that I like the most because it is has a clean UI and allows for the user to install APKs that are either downloaded or on a USB device. Some file managers do not allow for APK installation.
SDR Touch and Driver: This app allows me to process signals from the vehicle’s antenna and listen to local radio stations. The main inconvenience of the app is that it auto-launches at start up due to how the driver is configured.
Volume Notification: The volume buttons in my installation are not accessible. This app places a volume icon in the notification bar that you tap to adjust the volume output by the tablet. This is a better implementation of volume control when compared to my previous approach which required two down-swipes to access volume.
Reboot to Recover // Shutdown: The power button in my installation is not accessible. These apps allow me to power cycle the device or reboot into TWRP, if needed.
VCam2: This is the camera app that ships with Timur’s kernel. I included it because it often fails to install when launched from PowerEventManager after first boot.
Google Play Services: Some apps like Car Launcher or Google Translate need an updated version of the Play Services in order to access all their features. I found that v21.45.16 for Marshmallow with 300 dpi allowed for the map to be displayed in Car Launcher’s alternate screen. I think that updating Play Services can cause some other apps to stop working correctly, so test apps before installing the tablet.
Automate: This app allows you to create custom processes that run in the background. I am currently using this to shutdown SDR Touch at startup to compensate for the driver’s autolaunch, but it can automate virtually anything on your tablet.
Torque Lite: OBDII interface that has some nice features like calculating MPG while providing the basic diagnostics utility.
I chose to not link my Google account to the tablet because it probably will be stolen at some point and I don’t really want to have personal accounts accessible to others. This also means that I don’t have access to the Play store for apps. As a result, I sideload everything on the tablet. You don’t need to do this though if you create a throwaway Google account for your device or use your own personal account. APKs that I installed on my system are provided below out of convenience, but I don’t guarantee that they will work or don’t contain malware.
Files
- Car Launcher Free v3.0.4.10
- Files by Google v1.0.372842724
- SDR Touch v2.72
- SDR Driver v3.10
- Volume Notification v0.9.5
- Spotify v8.6.96.422
- Reboot to Recovery v3.5
- Shutdown v0.6
- Google Translate v6.16.03.352678460
- Google Play Services v21.48.16 Marshmallow 300dpi
- Torque Lite v1.2.22
- Automate v1.31.2
- Automate Superuser Permissions v1.2.3
Kernel Installation Guide
The primary guide for installing Timur’s kernel can be found on Reddit. The instructions he provides is pretty clear as long as you read the whole thing before you begin. Details for setting up your tools and rooting the device are listed near the bottom of his guide. I’m not going to repeat what is described there as much as provide additional instructions. I recorded a video of how to set up the kernel in case it is of any help.
-
Download all required modules.
- Download adb and fastboot platform tools. fastboot allows you to flash kernel and adb allows you to install apps and configure your device:
- Add the platform tools to the path of your terminal. In Windows, the syntax is as follows:
$env:Path+=";C:/path/to/platform-tools" -
Confirm that the binaries are on your path and executable by calling
adb devices. If the command errors out, check to see if adb is in your terminal’s path and executable. -
Connect your device to your PC, power off your device and hold the power button and volume down button for several seconds to enter the bootloader.
-
Root your device with
fastboot oem unlockand follow the instructions. -
Flash the stock MOB30X firmware using Nexus Root Toolkit (NRT) or the instructions provided by Timur. When using the instructions listed by Timur, my device would get stuck in a boot loop and I was not able to boot my device. I was able to get around this issue with NRT. Set your device type in NRT and follow the instructions for ‘Flash Stock + Unroot’. Use the MOB30X image.
-
After a few minutes, the screen will turn off. When it does, enter the bootloader again by holding the power and volume down buttons. DO NOT ALLOW THE OS TO LOAD!
-
Install the Recovery Tool TWRP by calling ‘fastboot flash recovery twrp_file.img’. Use the volume buttons on the tablet to navigate to
Recoveryand press the power button to enter. -
To access Timur’s kernel, unzip the v4.0-final-flo-deb file. There should be a flo ZIP and a deb ZIP as well as a PEM update ZIP. If you have the WiFi Nexus 7, extract flo. If you have the Nexus with a SIM card, extract deb. Once flo or deb is extracted, you’ll recover the usbhost and the services ZIPs. Drag and drop the
PEM update,usbhost,services, andSuperSUZIP files into thetwrpfolder of the Nexus 7 connected to your PC. -
On the tablet, follow the instructions to open TWRP and click the install button. Install the
servicesandusbhostZIPs first before theSuperSUandPEM updatezips. -
Reboot the device and allow it to complete its first boot. It can take up to 10 minutes to complete.
- Complete the standard welcome screen setup and grand Power Event Manager SU permissions when asked.
System Configuration Guide
This section focuses on basic app installation and points out small tweaks that are worth considering. Timur’s Pitfalls and Solutions guide is worth reading.
App Configuration
- Download and install all apps of interest. If sideloading apps from your PC, use the syntax as follows:
adb install filename.apk -
Device settings > select Home > Set Car Launcher as the default
-
Device settings > select Security > Screen lock > None
-
Device settings > select About tablet > tap ‘Build number’ 7 times to access Developer options
-
Device settings > select Developer options > Select USB Configuration > MTP
-
Device settings > select Developer options > Stay awake
-
Swipe down on the notifications bar until you see the gear icon in the top right. Hold down the gear icon for ~5 seconds to access System UI Tuner
-
Device settings > select System UI > Quick Settings > delete quick settings from the drop down that don’t interest you
-
Open Power Event Manager and select options of interest to you. The sleep and USB options can be useful.
-
Open Power Event Manager and launch VCam2 by tapping the Exec button. If it fails to launch, sideload it with adb as described above.
-
Open SuperSU and disable messages for Power Event Manager and VCam2.
-
Configure the Car Launcher home screen to match your preferences.
- Power off the tablet and enter bootloader mode by holding down the power and volume down buttons. Set the device to autostart when power is present with the following command:
fastboot oem off-mode-charge 0
Parts List and Files
This section encompasses everything that is required to build the system to give you an overview of what is involved. After listing the components, each section will examine why certain components were chosen in greater detail. Although software files are listed below, they are largely for my own reference of what was used in the event that I have to rebuild the system. I strongly encourage others to download files from the original provider and not from this page. There may be more recent versions available and you can’t be certain that these files haven’t been tampered with. The links to the original provider are listed. Hardware is listed first because the software is largely dependent on the employed hardware.
Hardware Description and Rationale
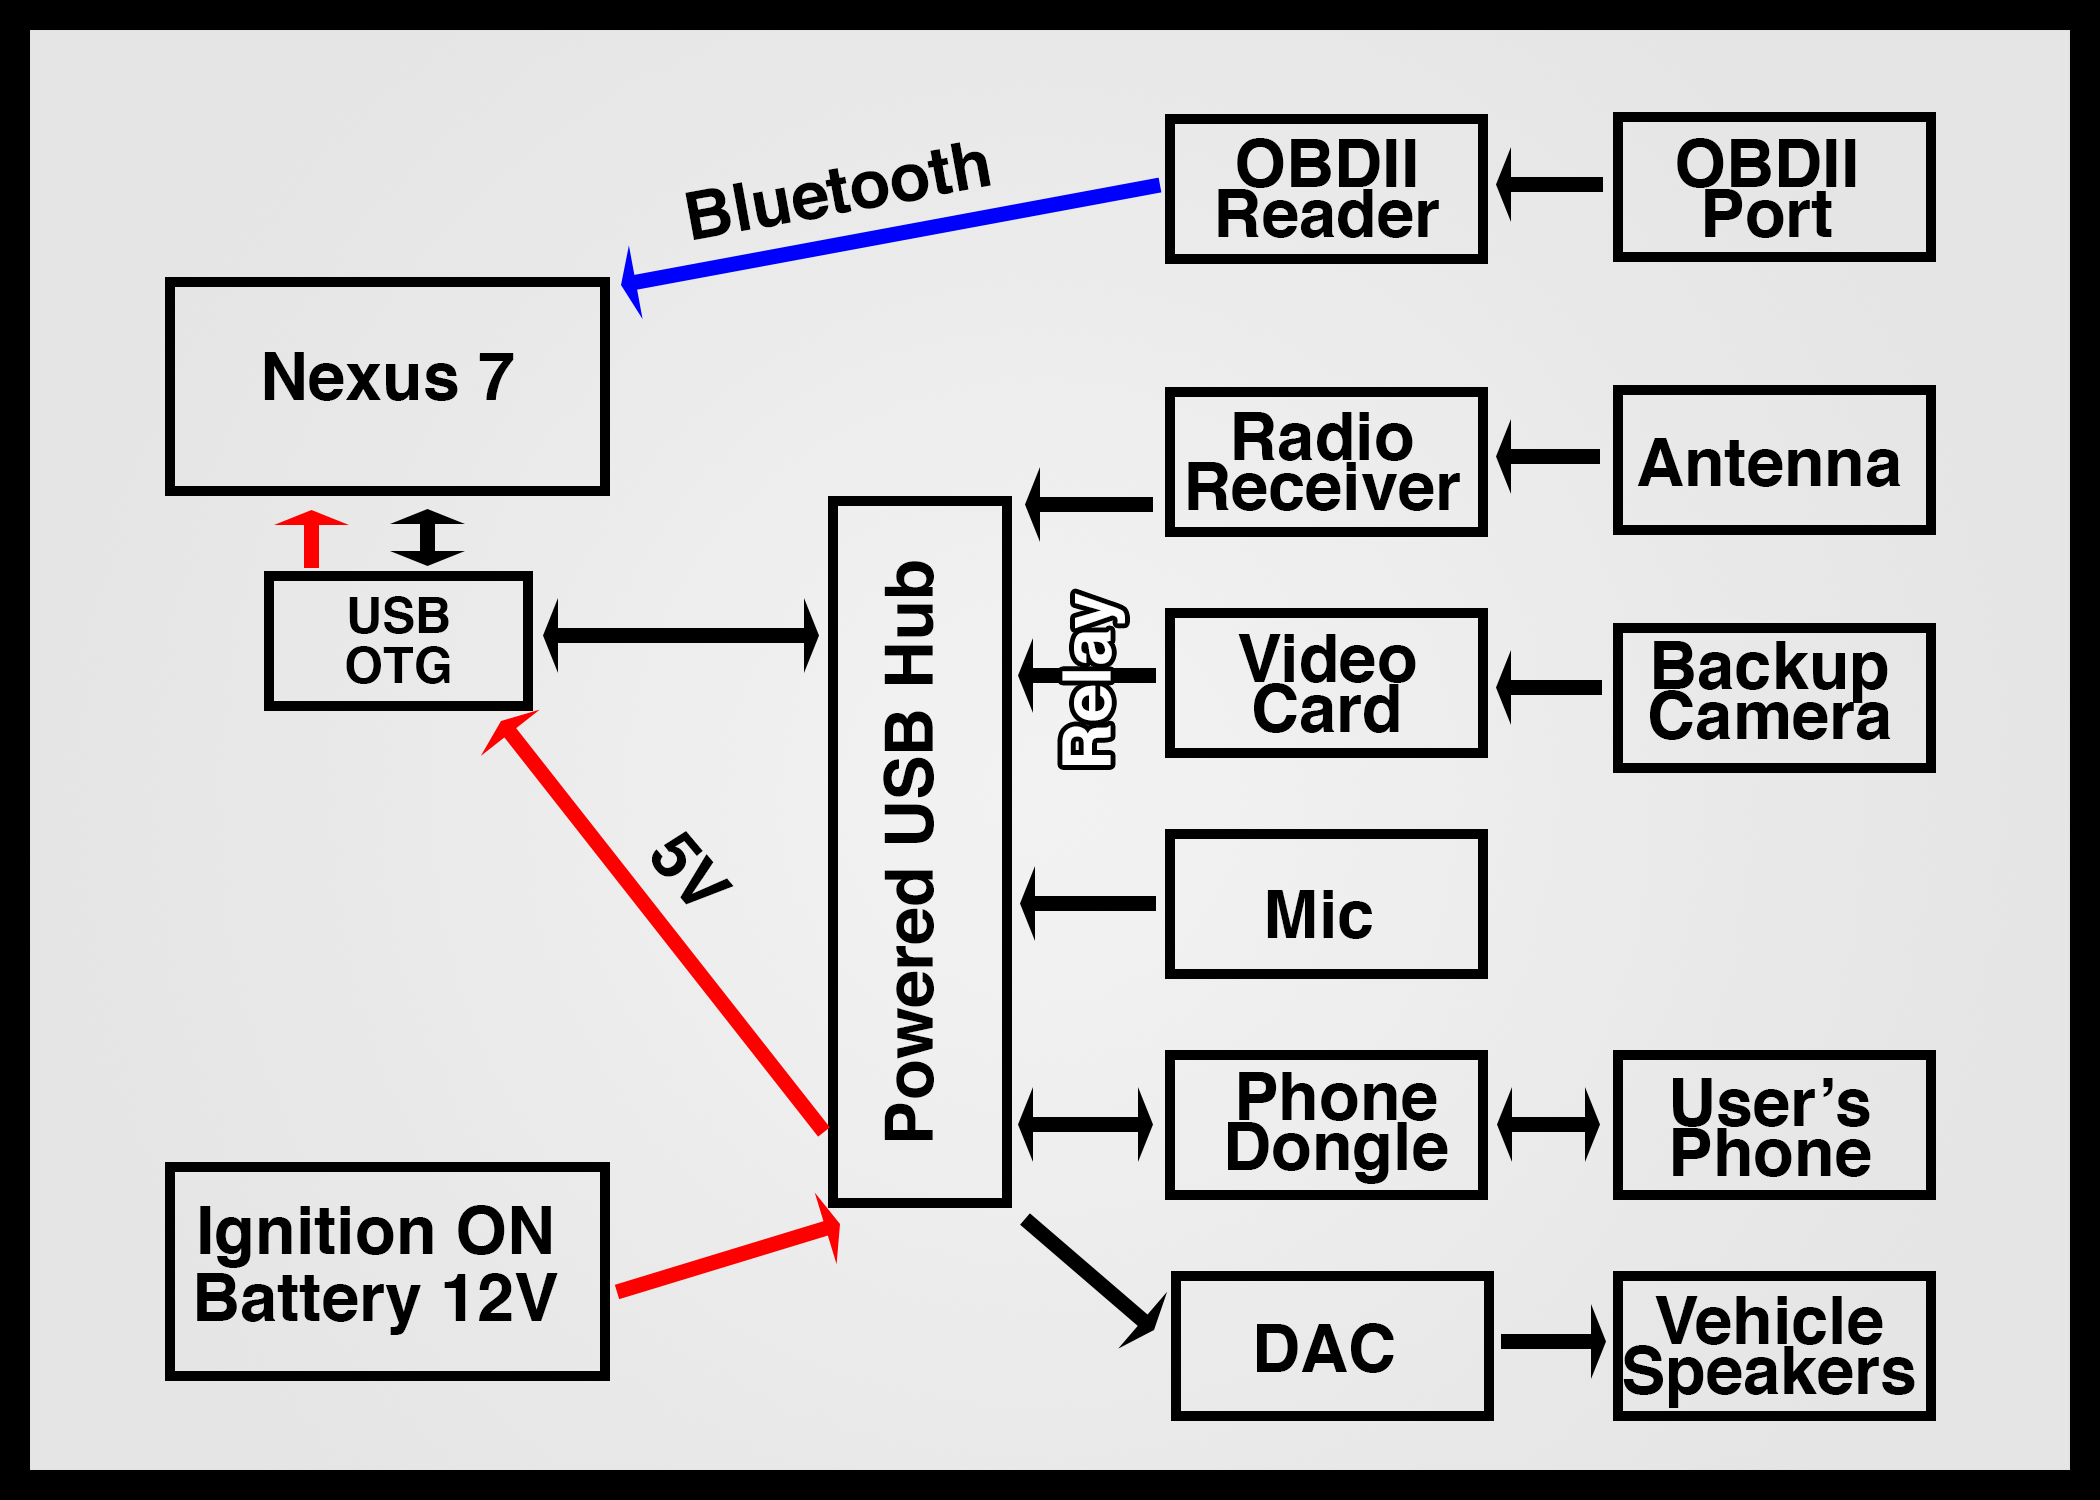
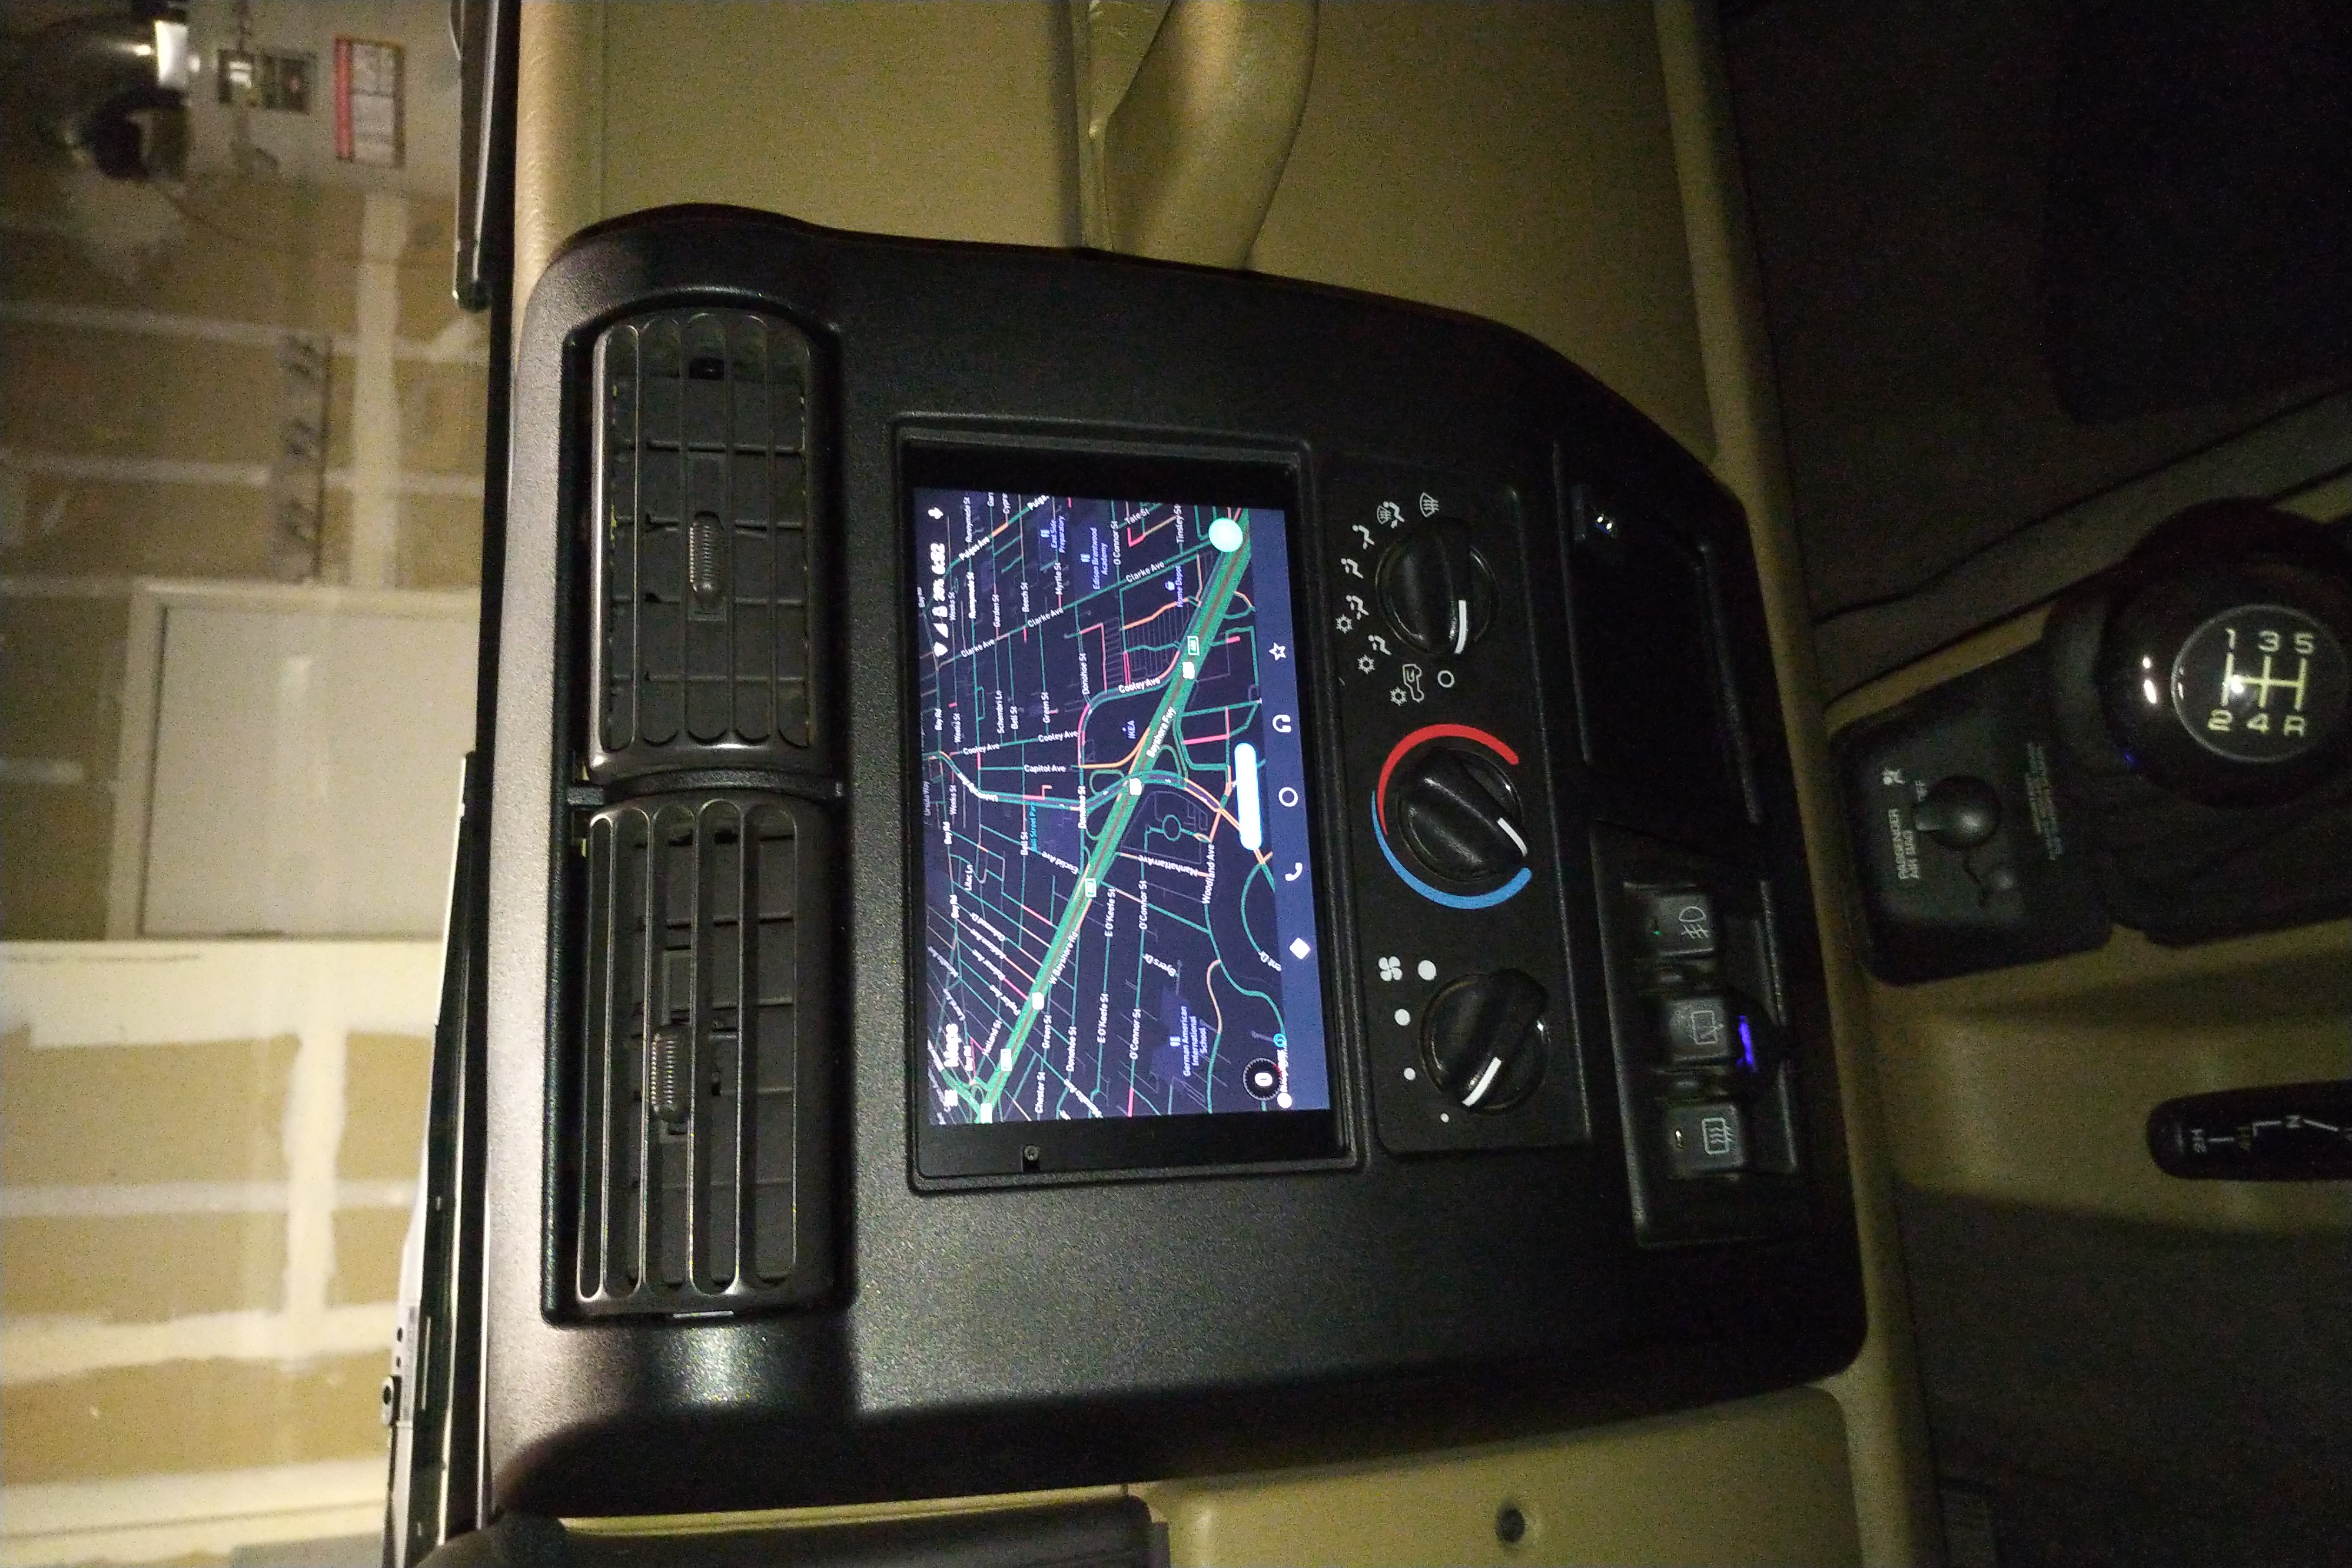
We’ll work our way from left to right in the figure above. The star of the show is the Nexus 7, 2013 edition. It is not the most advanced tablet in the market, but the screen has virtually a perfect form factor that matches a double DIN head unit and it has some of the most extensive kernel options available. We’ll be running Timur’s Kernel v4.0 to integrate the tablet into the Jeep as permanent hardware.
To assert the tablet as the host of the system, all connections must be routed through the on-the-go (OTG) adapter. From here, a special Y cable connects to the powered USB hub to provide the tablet with a high amp supply and to route data. This USB hub is powered by a 12V line that is only active when the ignition is on. This allows the tablet and peripherals to enter a deep sleep / off state when there is no auxiliary power - saving your vehicle’s battery when off.
From here, the peripherals are completely user dependent and there is quite a bit of flexibility in options. Not everyone will be interested in having Android Auto / Apple CarPlay, OBDII diagnostics, or a microphone in their vehicle. I did this because the features seemed useful to me.
The OBDII unit sits in your vehicle’s OBDII port and can transmit data directly to the Nexus 7 via bluetooth. The OBDII port is still powered when the vehicle is off, so a minor modification will be made to the bluetooth unit to only power it when auxiliary power is available.
The radio receiver connects to the USB hub and is controlled by an app on the tablet. It is quite capable of receiving all FM channels and more; however, it is unable to receive AM broadcasts. The transmission frequency for most AM stations is too low for this unit to detect, but other units (such as a HAM upconverter) should make AM accessible if desired. This receiver employed here connects to a F to SMA adapter, which will allow you to plug the antenna into the unit. I was unable to find a Motorola to SMA adapter, so we’ll have to modify the adapter a bit to make things work.
A few video cards are usable with Android 6.0.1, but I went for what I thought was the simplest. A subset of USB video cards (UVC) should not require any drivers on any system (including Windows 2000). A lot of cheap cards say they are UVC but still require drivers, which defeats the purpose. Try to avoid those ones to make your life easier. The video card is connected to the USB hub and also has its power switched by an automotive 12V relay. Whenever the reverse gear is engaged, the reverse wire is brought to 12V. When this happens, the relay will power the UVC, which will then begin transmitting video data directly to the Nexus 7. Furthermore, the backup camera also taps the 12V line that power the reverse lights, so the camera will be powered simultaneously.
The microphone isn’t anything special. In this case, it’s just a USB mic with an integrated driver. A microphone that plugs into the 3.5mm jack on the tablet might work as well. Alternatively, there are bluetooth microphones that might be a better choice.
The phone dongle is a bit of an experiment. This unit should allow for Android Auto or Apple CarPlay to be retrofitted onto older head units, but no one has done it with a Nexus 7 as far as I’m aware of. This dongle should allow the phone to replace the tablet interface and allow for phone calls among other features (search Android Auto or Apple Car Play).
Last but not least is the stereo preamplifier. This takes audio signals from the Nexus 7 and processes them to interface with the vehicle’s speakers. To interface with the preamplifier, you can either use the 3.5mm audio jack on the tablet or use a dedicated USB digital-to-analog converter (DAC). There are some issues mentioned on the forum regarding not being able to use a mic when audio is connected, but I haven’t run into that problem yet. The preamplifier I am using drives the vehicle’s stock speakers at approximately the same wattage as the stock radio. If the speakers in your vehicle need more power, you can place an amplifier between your preamp and speakers to drive them.
Hardware Components
The Amazon Affiliate links below help fund future Build Your Own projects at no cost to you. If you do not wish to support this work, the model number is provided for your reference.
| Item | Model | Provider | Cost |
|---|---|---|---|
| Early TJ Double Din Bezel | Metra 95-6549 | Amazon | $88.13 |
| Tablet | Nexus 7, 2013 | Amazon | $79.95 |
| Powered USB Hub | Kootion H6C21 | Amazon | $25.99 |
| Phone Link Dongle | Carlinkit HW01-01 | Amazon | $49.99 |
| Preamplifier | Skar Audio SKA7EQ | Amazon | $46.74 |
| 3.5mm to RCA cable | Mbzzke 26121600 | Amazon | 7.99 |
| RCA to wire adapters | Daykit SC-001 | Amazon | $7.99 |
| Radio Receiver | NooElec NESDR Smart | Amazon | $23.95 |
| USB Video Capture Card | EasyCAP FBA_UVC Black | Amazon | $9.99 |
| Backup Camera | DohonesBest 4350450562 | Amazon | $13.99 |
| USB Microphone | Fulaim Lapel Microphone | Amazon | $19.95 |
| OBDII Reader | Panlong PL-B02 | Amazon | $12.59 |
| USB OTG Adapter | Cablecc B01KCBSKSA | Amazon | $6.30 |
| USB Y Cable | SaiTech B00VV24L7E | Amazon | $4.99 |
| USB A Extender, Right Angle | Proaccmart | Amazon | $5.80 |
| Panel Mount USB Port | Batige Square Single Port | Amazon | $8.90 |
| SMA Coaxial Adapter | DHT AD012 | Amazon | $5.50 |
| Antiglare Screen Protector | BoxWave bw-862-4841-0 | Amazon | $10.95 |
| Fuse Taps | Camway 150x | Amazon | $7.99 |
Total cost of all hardware for a 2001 TJ installation is $437.68 if all peripherals are installed. I think that you could probably buy a decent touchscreen head unit in 2022 for that price.
If you already have a vehicle with a double din bezel, have a Nexus 7 and aren’t interested in having Android Auto or Apple CarPlay features, you could reduce the cost to $219.16. You could probably get rid of the microphone. The SDR dongle wouldn’t be necessary if you plan to listen to Spotify and don’t care about tuning in to local radio stations.
Software modules
Although there is a high degree of flexibility in hardware, it is greatly outmatched by that of the software. I’ll list a few applications that I believe are essential for my use case and will leave all other remaining preferences to the reader. None of the following modules are required to implement an Android head unit and it may be worth your time to explore other options.
Automotive Kernel
First and foremost, I chose to build the head unit off of Android 6.0.1 with Timur’s v4.0 kernel. This setup allows the Nexus 7 to charge while also acting as the OTG host for the USB peripherals. It also includes some nice features for an automotive setting such as automatic deep sleep when the ignition is off or automatically launching a backup camera when the reverse gear is engaged. Timur provides instructions on how to install everything, but I will go into a bit more detail in the build guide below because some things were not readily apparent to me. Potential problems and workarounds with this method are listed in the Pitfalls and Solutions thread.
Clean Interface
It’s important to me that I have a clean home screen with no bloatware. If I’m driving, I don’t accidentally want to tap the (in my opinion) useless Google Search bar. I also want to maximize the real estate of the screen, so no dock. As you might observe from this website, I prefer minimalistic designs. I found that the Evie Launcher was perfect for my use case and would highly recommend it. I was able to clear the home screen completely and only have a large clock and essential app shortcuts. Most of the settings in the launcher were disabled by choice.
Vehicle Dashboard
The interface that I’m currently using is Car Launcher, but I’m open to trying out others if there appears to be something better. The benefits of a system like this is that it can cleanly organize navigation, phone call, media operations, and OBDII readouts.
Other Modules
Radio Tuner: SDR Touch
OBDII Readout: Torque Lite
Volume Control and Nav Bar Removal: Custom Quick Settings
Backup Camera : VCam2 (Shipped with Timur’s Kernel)
Phone Dongle App: Carlinkit Autokit.apk
The following files are listed in the event that the files from Timur’s Reddit thread are lost. I would advise you to not download these if the official versions are still available:
TWRP 3.0.2-0 Debian
Timur Kernel N7 2013 v4.0 Final Flo Debian
SuperSU v2.76
Also required is the factory MOB30X Android image.
Build Guide
(Edit: 2022)
I recently reinstalled the kernel and apps and created a few videos of the process and posted them on Youtube. I’m posting them here in case you want to follow along, but feel free to read through the text that I wrote a few years ago if it helps! The videos are for Windows 10 and the text is for OSX.
(Original)
The build guide is quite extensive - we’ll cover the software aspect first before the hardware. The primary software guide can be found on Reddit, the following is largely a reprint of what is there in addition to a few other details. Timur’s original commentary is italicized and additional commentary I included is written in normal font.
Installation of Android Tools
Before your system can push software from your computer to the Nexus, some development tools have to be installed on your computer. ADB allows debugging of Android over USB and fastboot allows you to unlock the bootloader and push custom software onto the unit. Either Google search how to install those tools or run the following on OSX:
brew cask install android-platform-tools
Timur’s instructions:
Now enable the “USB debugging” feature on your Android device. In order to do so, open Settings and then open “Developer options”.
If you cannot find “Developer options” in the list, go to “About tablet” and click the “Build number” five times in a row, until you see a toast message, telling you that: You are now a Developer. Now leave “About tablet” and you should be able to see and open “Developer options”.
Under “Developer options” you should now be able to enable “USB debugging”. While you are in “Developer options”, you may also want to enable “Stay awake”. This feature is useful, if you want to use the FI-mode feature.
With your tablet connected to the PC, you should now be able to open a command shell on your PC and run the following commands. This is for testing connectivity only:
adb shell date
This should display the current time and date of your Android device on your PC. If this doesn’t work, try the following:
adb devices
This should show the “List of attached Android devices” in the command shell on your PC. If this does not show at least one Android device (with a serial number and a name), you should try unplugging and reconnecting the USB cable. You may need to confirm ADB connectivity in a dialog box on your Android device. If you are not able to establish ADB-over-USB connectivity, google for “adb windows” and/or “adb windows usb drivers”. And possibly install/update the required USB drivers. Continue only, if the adb tool is working properly.
Unlocking the Bootloader
Timur’s instructions:
If your tablet’s bootloader is not yet unlocked, you need to unlock it now. This can be done in two quick steps by running the following commands in the command shell on your PC:
adb reboot bootloader
And then, when the tablet shows the bootloader screen, run:
fastboot oem unlock
NOTE: Unlocking the bootloader will fully wipe your device. You need to confirm the unlocking procedure on the device screen. As long as you don’t lock your bootloader again, you only need to do this once.
Kernel installation
Download the following files:
- Android factory image
- TWRP images
- SuperSU ZIP
- Timur’s kernel ZIP
The factory image, TWRP recovery tool and Timur’s kernel will be dependent on the platform you have. The 2013 Nexus with WiFi will use the Flo variants of the files and the LTE version will use the Debian variants of the files. The following will be written specifically for the flo installation.
Unzip Timur’s kernel. Inside the ZIP are two folders of interest - “timur-kernel-n7-2013-v4.0-final.zip” and “timur-pem-update-v4-b107-2017-01-06.zip”. Unzip the kernel directory to access the USB host and services ZIPs. Both of those and the pem-update will be uploaded to the Nexus 7 in their ZIP format. These files will be installed onto the Nexus first before the SuperSU zip is installed.
Returning to Timur’s instructions:
Here I describe how you can upgrade your tablet to Android 6.0.1 MOB30X, install Timur’s Kernel v4.0 as well as root, without losing any apps or settings - and do so in under 20 minutes. To do this, your tablet bootloader needs to be unlocked once. If you already have a rooted Android 6.0.1 MOB30X with TWRP installed on your tablet, the kernel installation can be done in just a few minutes. In this case, reboot into TWRP and continue with step 4.
-
Unzip the target Android 6 MOB30X factory image on your PC. In order to prevent the factory image installation from wiping the data partition of your tablet (if you want to keep your installed apps, personal settings and custom data), you need to edit your flash-all script (.sh or .bat, depending on what OS you are using on your PC). To keep your apps and data, remove the “-w” parameter from the last line. However, if want to delete everything on the tablet (wipe) and fully start from scratch, do not modify the flash-all script (keep the “-w” parameter in). Before you continue, this is your last chance to create a full device backup of your tablet. For instance, you can create a full device backup in TWRP recovery.
-
To install the factory image, connect the tablet to a PC via USB and run the (modified) flash-all script. The installation process will take a couple of minutes. This is IMPORTANT: You need to watch the tablet screen closely, because you need to prevent the tablet from booting into Android automatically at the end of the installation process. As soon as you see the tablet screen turn off, you need to quickly press power + vol-down and keep both buttons pressed for about 15-20 seconds. This will abort the boot process and instead, the tablet will return to the bootloader menu. You need to keep pressing the two buttons until you actually see the bootloader menu. This is when you can release the buttons. The point of all this is, to install TWRP and SuperSU BEFORE the newly installed Android system boots up for the first time.
-
With the tablet in bootloader (you may need to disconnect/reconnect the PC-USB connection), you can now install TWRP recovery. You always need to do this, because flash-all will overwrite a previous instance of TWRP. To continue, enter in a command line window on your PC: “fastboot flash recovery twrp-3.0.2-0-flo.img” (if you have the LTE model, use the img-file of the deb variant). When done (only a second later), you should be able to launch the newly installed TWRP from bootloader menu. Use the volume keys to select “recovery” and then hit the power button to launch TWRP.
-
With TWRP recovery running, the tablet should now appear as a USB drive on your PC. This lets you copy the three zip archives required for the next step over: timur-services, timur-usbhost and SuperSU. Make sure these three files are available on the tablet’s internal sdcard. Then install the three zip files (timur-services + timur-usbhost before SuperSU!), using the TWRP on-screen UI. Note that whenever you update the kernel (usbhost), you will also need to re-install SuperSU afterwards. - OK, done. You can now restart system and boot into Android OS.
RRP:
The installation of the ZIPs was a bit unfamiliar to me when I started, so I’ll explain it in a bit more detail. In your terminal, change directories until you’re where your ZIP files are located. These ZIP files are outlined in the first two paragraphs of this section.
To transfer the files, run the following command for each ZIP:
adb push {insert-filename-here}.zip /sdcard/
Now, all of the files should be located on the tablet in the /sdcard/ directory. On the tablet, select the Install Package button and navigate to the directory. Starting with the two ZIPs from Timur’s kernel, select the file and install one at a time. These ZIPs failed the checksum of the installation when I tried, so unchecking that option before installing seems to work. After Timur’s ZIPs, repeat with SuperSU.
Afterwards, in order to allow the Nexus to boot automatically when powered (say the battery dies after sitting in an idle vehicle for a few months), run the following command:
fastboot oem off-mode-charge 0
This can be done at anytime as long as the Nexus is in the fastboot menu.
Post installation
Now that the core OS is in place, a few small features can be implemented for seamless use of the device.
Timur’s instructions:
-
On first boot after installation: Do not immediately open PowerEventMgr. Instead, let the system rest in Launcher for a minute. You should see a SuperSU permission dialog show up for PowerEventMgr (PEM). Grant root access to PowerEventMgr. You can now open PowerEventMgr and, for instance, enable FI-mode and fast charging.
-
VCam2 app will be installed (or updated) when you launch PowerEventMgr and click the “Launch VCam [Exec]” button. If you intend to use VCam2, you should click this button once, every time you have installed or upgraded the kernel (usbhost installer) via recovery system. Launching VCam2 for the first time will bring up a SuperSU permission dialog. It is necessary to grant VCam2 root permissions.
-
It is also possible to install VCam2 manually, by opening VCam2.apk from the /sdcard/ folder (say, using a file manager app). Once VCam2 has been installed (or updated), the file /sdcard/VCam2.apk can be deleted.
-
It is suggested you disable SuperSU toast messages for PowerEventMgr and VCam2. To do so, open SuperSU app, select PowerEventMgr and change the Notifications setting from “Global defaults” to “Disabled”. Hit the check mark to store the modified settings. Now do the same for vcam2. And hit the check mark again to store the modified settings.
-
You need to disable Android OTA updates. If you allow an Android OTA to update your system, the kernel, the custom recovery and SuperSU will be removed. Do this: Long press the notification (i-icon) and block, then disable it in app settings. More: https://www.reddit.com/r/timurskernel/comments/4appwx/anyone_know_how_to_remove_the_android_update_is
-
In order to use PowerEventMgr (PEM) Wakeup-screen, the Android lock-screen must be disabled (see: Security).
-
You probably want to enable: Settings / Developer options / Stay awake (Screen will never sleep while charging).
-
You can view the kernel identification string under: Settings / About. It should now say “USBhost…“.
-
You can view the version info and build number at the bottom of the PEM activity.
-
If your system works well, re-boot into TWRP recovery mode and create a new full backup to a USB flash drive (connected via OTG cable).
-
Keep all of your installer files, including the correct variants of TWRP and SuperSU, in a save place.
RRP: Now that everything is set, go ahead and install your desired Android apps and customize your system as desired. My preferred applications are outlined in the “Software Modules” section before the build guide begins.
Leave a Comment
Comments are moderated. Email won't be published. All fields are required. *