ODrive Anticogging - Firmware v0.5.1
Overview
Cogging is an effect that is rather apparent on brushless DC motors when they move at slow speeds. Rather than having smooth and continuous motion, the motor visibly accelerates and decelerates and has a jerky motion profile. This is a result of the stator and rotor magnetically coupling, such as when an iron stator aligns with the embedded magnets in the rotor.
If cogging poses a problem, there are some ways to reduce its effect. Gimbal motors are often used with cameras and tend to be known for their lower cogging torque. Other motors use clever stator and rotor designs to reduce cogging. If the motor cannot be changed, inserting gearing into a drivetrain will allow the motor to operate at higher RPMs where cogging is less obvious. A final solution would be to apply an anticogging algorithm to a closed loop control system to map where magnetic coupling is the strongest and offset its impact. Here’s a video from ModLab at U.Penn that gives more information regarding the issue and their algorithm:
In this post, I’ll be covering how to run the anticogging algorithm built into the ODrive with a v3.5 motor controller using firmware v0.5.1. (Edit: 20250523 - Anticogging at the time of publication was not a stable feature. I would check with the community to see if things are better these days. If this feature is required, other solutions may be a better fit.)
Andy Vickers made an anticogging guide earlier this year along with a Youtube video to show how it’s done and can be found here. There were some complaints that it didn’t work, so I went ahead and tried it and I ran into some issues as well. The gains were too high for me, which caused my motor to vibrate around and it couldn’t calibrate. It clearly worked for Andy, but it seems like it isn’t a universal solution. After playing around with the configuration and an ODrive 5065 motor, I found a process that worked for me and I posted it below to save myself time when I calibrate more boards/motors in the future.
Guide
Before and After Calibration
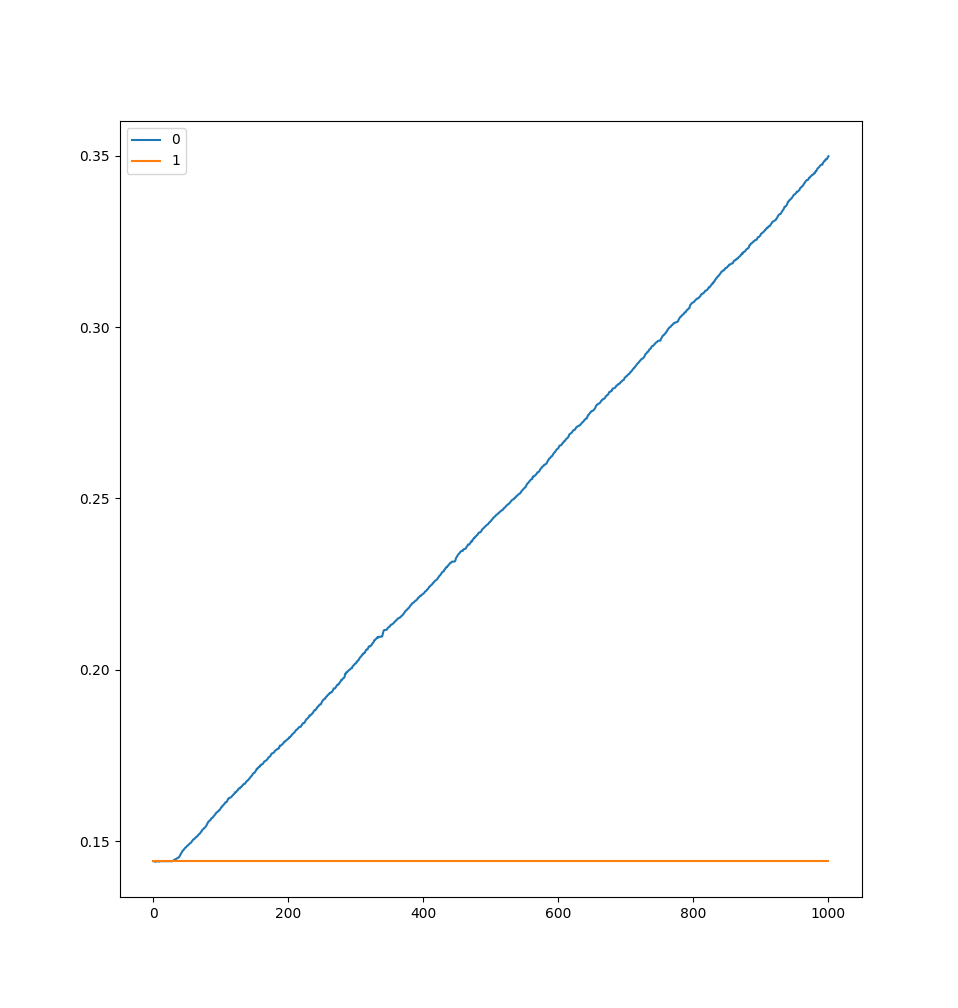
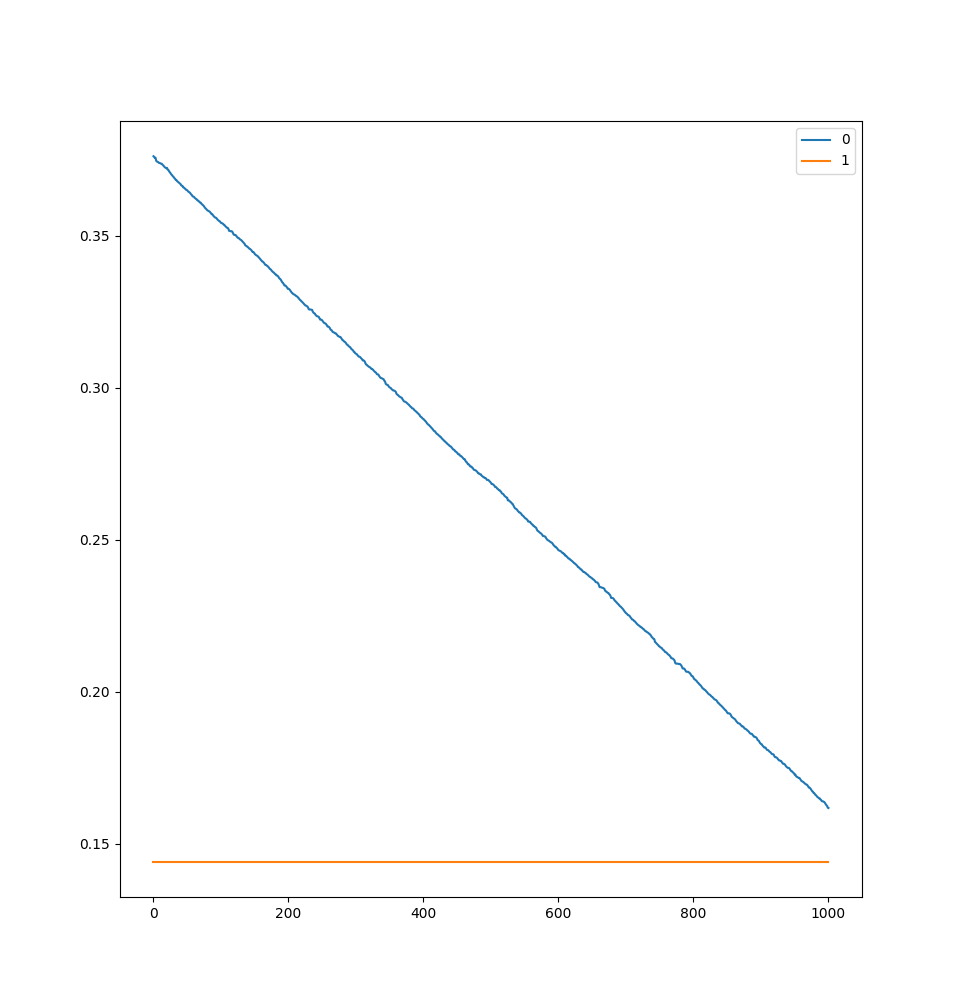
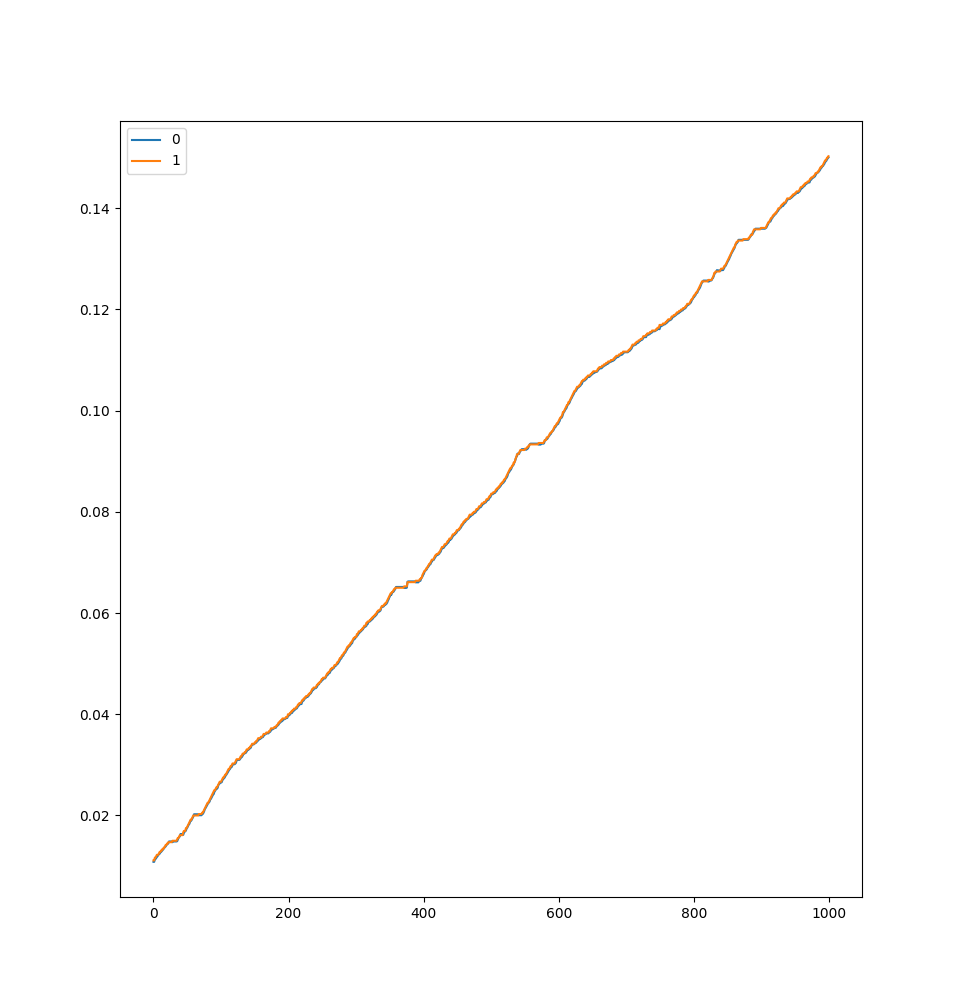
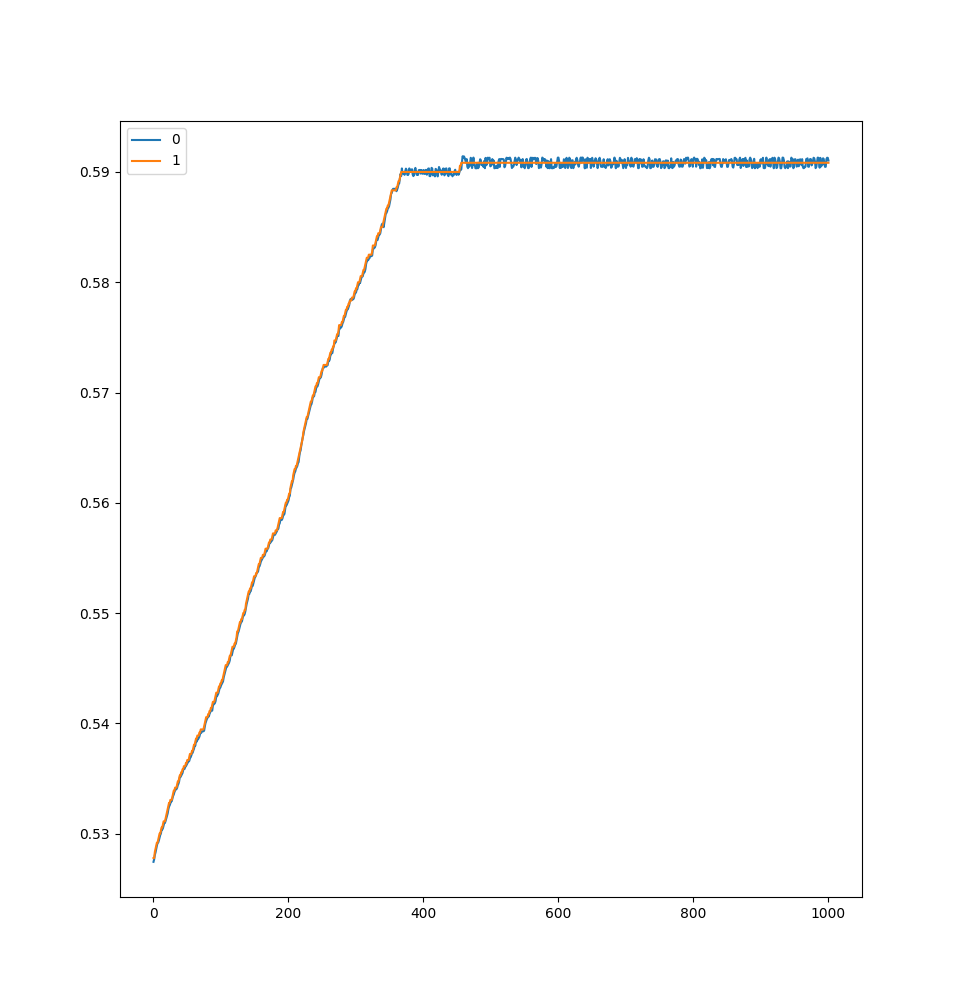
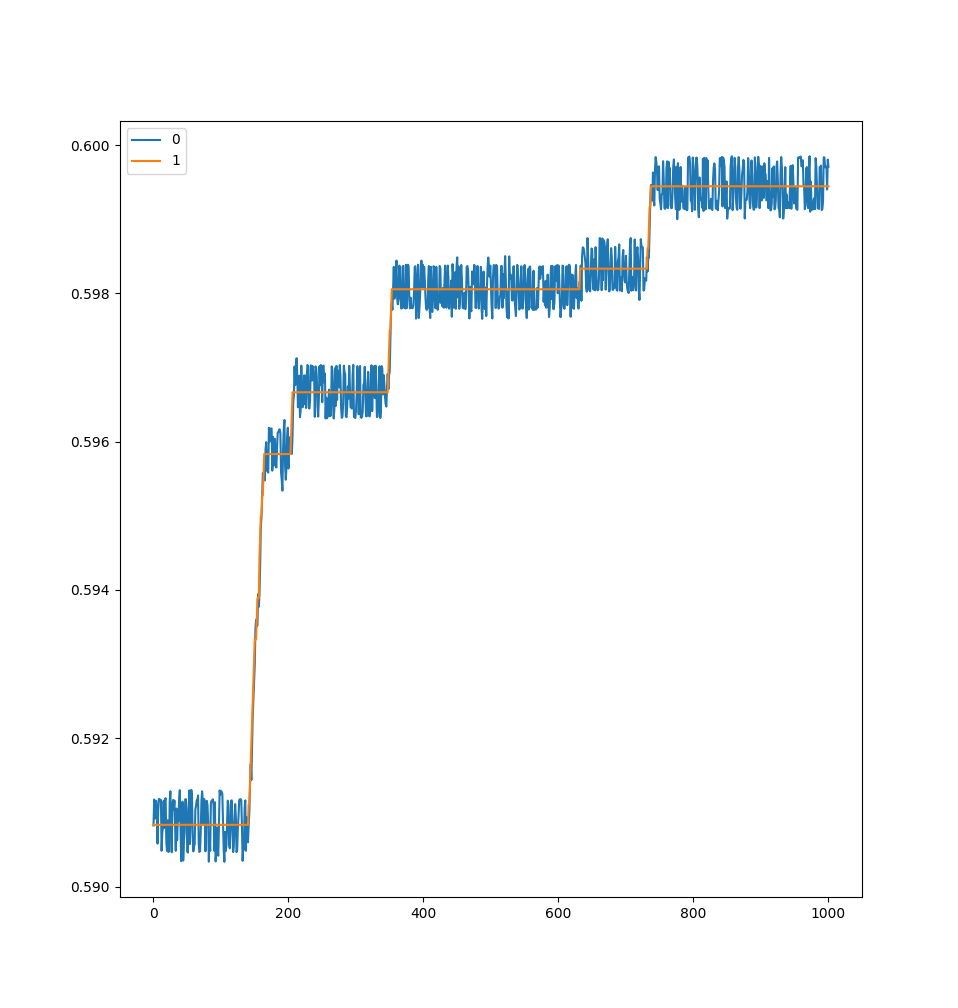
Once my board was configured with the tuning guide below, I evaluated the anticogging correction by looking at the smoothness of the motor as it moves forward and backward at 0.01 turns per second using the following code:
start_liveplotter(lambda:[odrv0.axis0.encoder.pos_estimate, odrv0.axis0.controller.pos_setpoint])

odrv0.axis0.requested_state = AXIS_STATE_FULL_CALIBRATION_SEQUENCE
odrv0.axis0.requested_state = AXIS_STATE_CLOSED_LOOP_CONTROL
odrv0.axis0.controller.config.control_mode = CONTROL_MODE_VELOCITY_CONTROL

odrv0.axis0.controller.input_vel = 0.01
# Repeat in the opposite direction
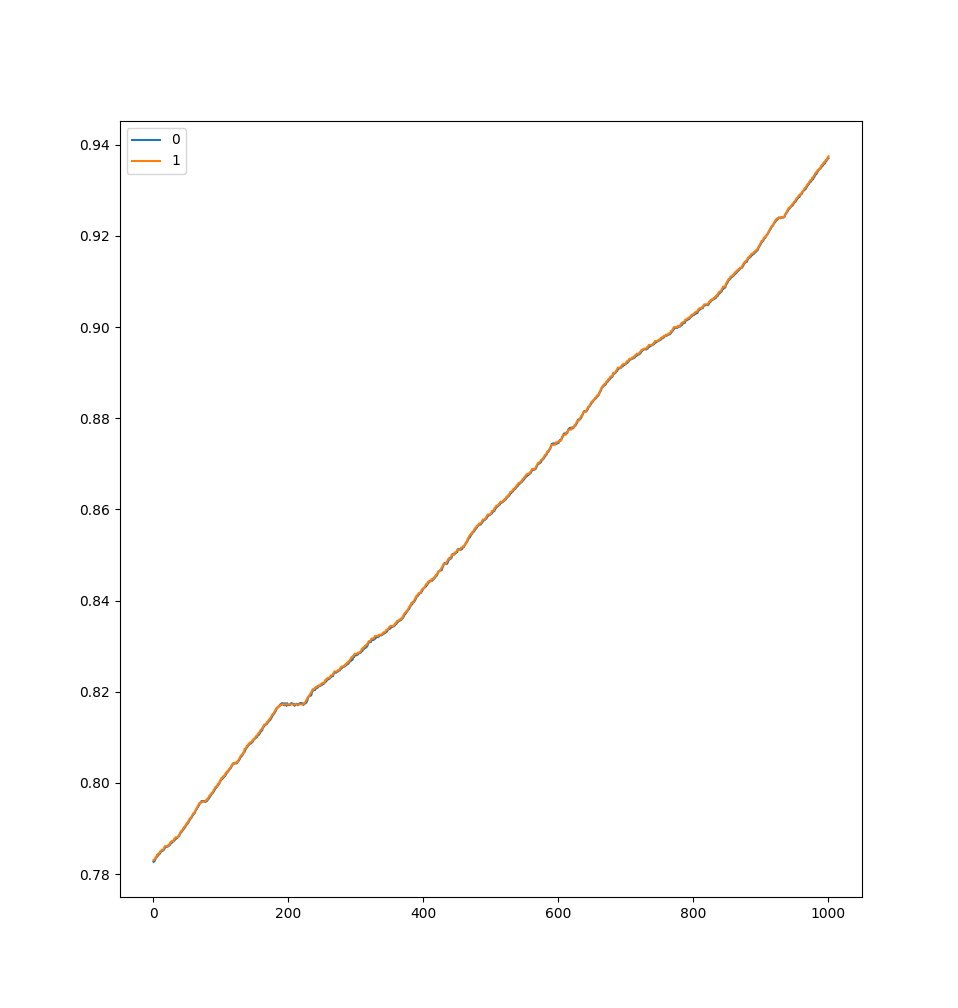
If you’re able to get anticogging to work, this is the type of improvement you should expect:
Getting Started
Literally follow the getting started guide. Note: This guide is only for Motor 0. To work on Motor 1, change axis0 to axis1 in the following commands.
- Install Python 3
- Create a virtual environment and install odrive (Linux). Whenever you want to use the ODrive Python utilities, you’ll need to activate the virtual environment if you use my method.
python3 -m venv venv-odrive source venv-odrive/bin/activate pip install odrive - Update the firmware on the board via DFU. This guide is valid for firmware 0.5.1. If you run into langid issues on Linux, change to the root user, activate the virtual environment and try this step again. On Windows, flashing failed with the error
AttributeError: module 'fractions' has no attribute 'gcd', so I used a Raspberry Pi to flash the firmware without issues.odrivetool dfu - Configure the board for your motor. I’m using a ODrive 5065 motor with a 0.47 Ohm brake resistor and an AMT 103 encoder with the highest resolution setting. Erase the configuration just to be certain that you’re starting fresh.
odrivetool # wait for connection odrv0.erase_configuration() # just in case odrv0.axis0.motor.config.current_lim = 10 odrv0.axis0.motor.config.calibration_current = 10 odrv0.config.brake_resistance = 0.47 odrv0.axis0.motor.config.pole_pairs = 7 odrv0.axis0.motor.config.torque_constant = 8.27 / 270 odrv0.axis0.encoder.config.cpr = 8192 odrv0.axis0.controller.config.vel_limit = 5 odrv0.save_configuration() - Confirm that your motor moves
 odrv0.axis0.requested_state = AXIS_STATE_FULL_CALIBRATION_SEQUENCE
 odrv0.axis0.requested_state = AXIS_STATE_CLOSED_LOOP_CONTROL
 odrv0.axis0.controller.input_pos = 1
 odrv0.axis0.controller.input_pos = 0
If it moved one full revolution forward and backward with the input_pos commands, you should be good to go to the next step. If it moved once and didn’t return, it likely errored out. You can begin troubleshooting by calling dump_errors(odrv0) and then searching your errors.
Tuning
Following the tuning guide with a bit of deviation. This is necessary for anticogging since it is VERY finicky in this firmware version.
- These are close to the default values in case you need them. If your motor gets a bit wonky, I would call
odrv0.reboot()to restore the default settings.odrv0.axis0.controller.config.pos_gain = 20.0 odrv0.axis0.controller.config.vel_gain = 0.16 odrv0.axis0.controller.config.vel_integrator_gain = 0.32 - Start up the live plotter to check your motor’s movement, reset the controller to the last saved configuration, and enter position control mode.
start_liveplotter(lambda:[odrv0.axis0.encoder.pos_estimate, odrv0.axis0.controller.pos_setpoint]) odrv0.reboot() odrv0.axis0.requested_state = AXIS_STATE_FULL_CALIBRATION_SEQUENCE odrv0.axis0.requested_state = AXIS_STATE_CLOSED_LOOP_CONTROL - Zero the velocity integrator gain and change the velocity gain until the motor vibrates.
 odrv0.axis0.controller.config.vel_integrator_gain = 0
 odrv0.axis0.controller.config.vel_gain = odrv0.axis0.controller.config.vel_gain * 1.3
 # Continue to increase gain until jitter is visible on the live plotter
 odrv0.axis0.controller.config.vel_gain = odrv0.axis0.controller.config.vel_gain * 0.5
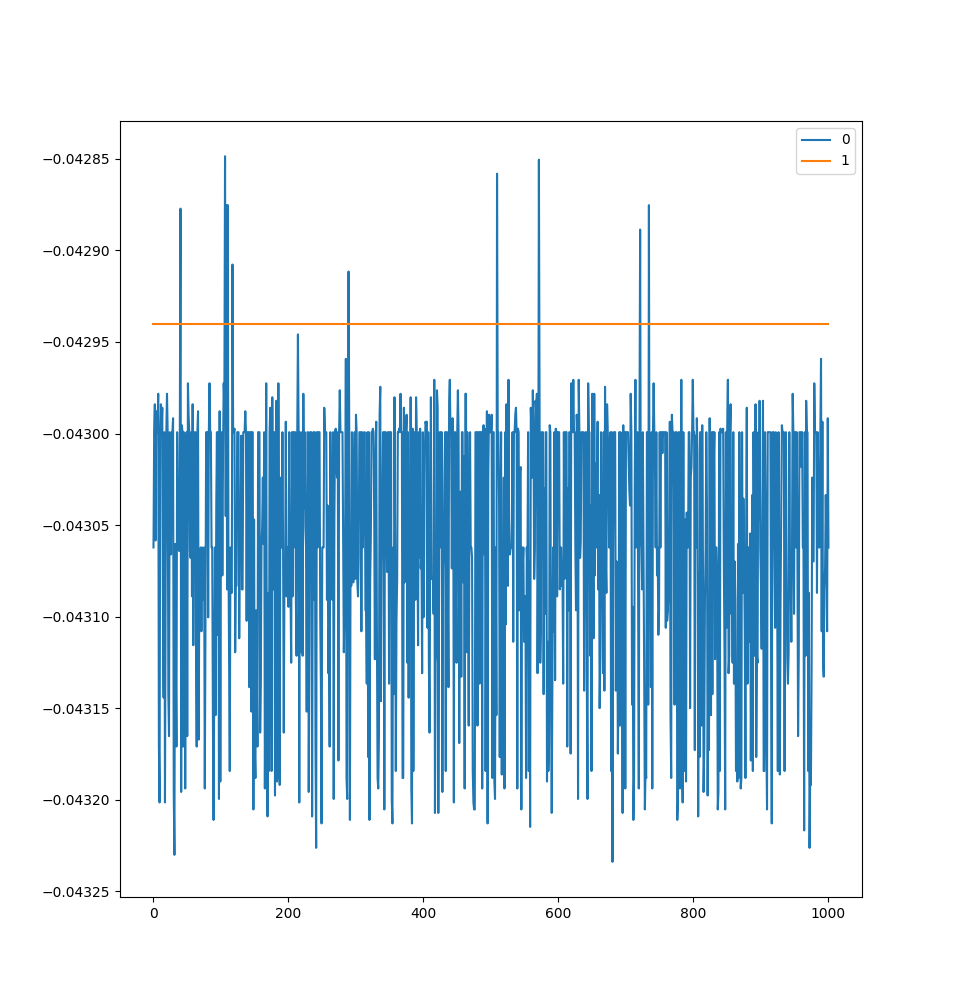
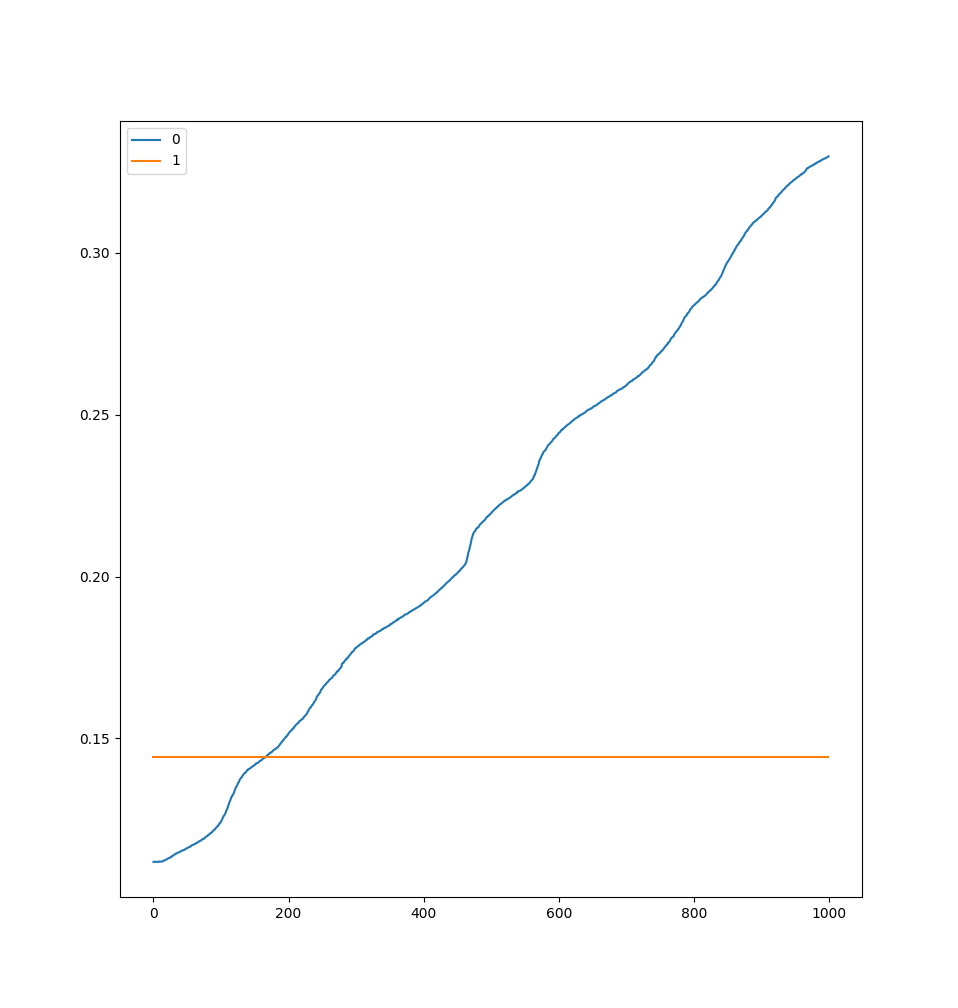
- Change the position gain to maximize the gain while minimizing the jitter. Increase the pos_gain by 5 until the jitter increases and then reduce it to find a stable value. This is different than the overshoot advice given on the page.
 odrv0.axis0.controller.config.pos_gain = odrv0.axis0.controller.config.pos_gain + 5
 # Repeat until the motor appears more jittery on the live plotter
 odrv0.axis0.controller.config.pos_gain = odrv0.axis0.controller.config.pos_gain - 1
 # Reduce the gain until the jitters are minimized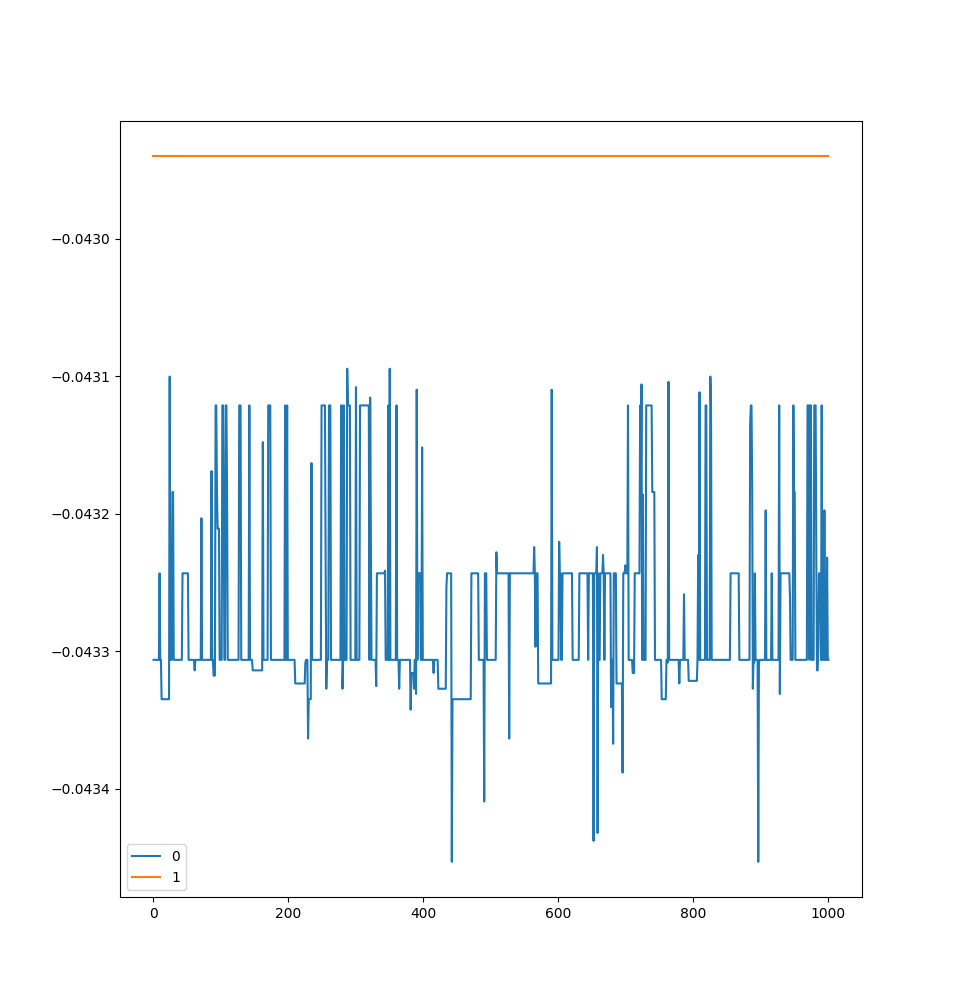
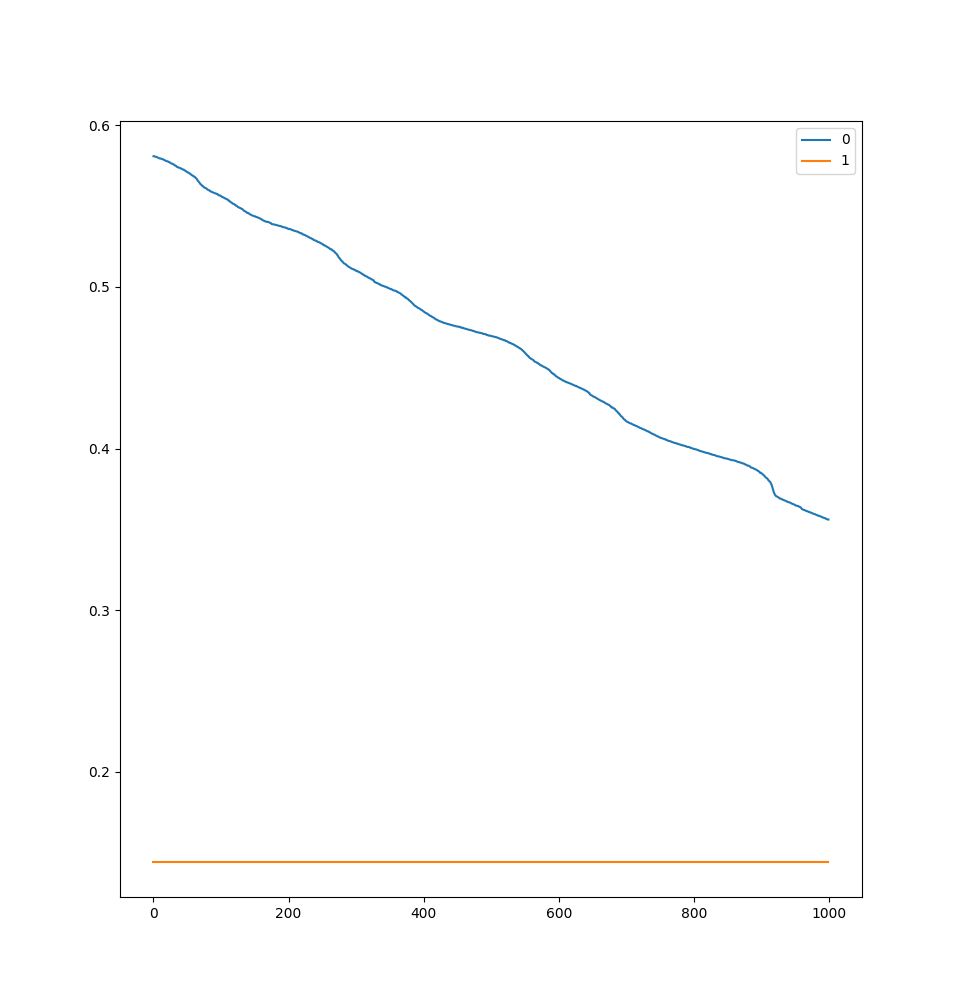
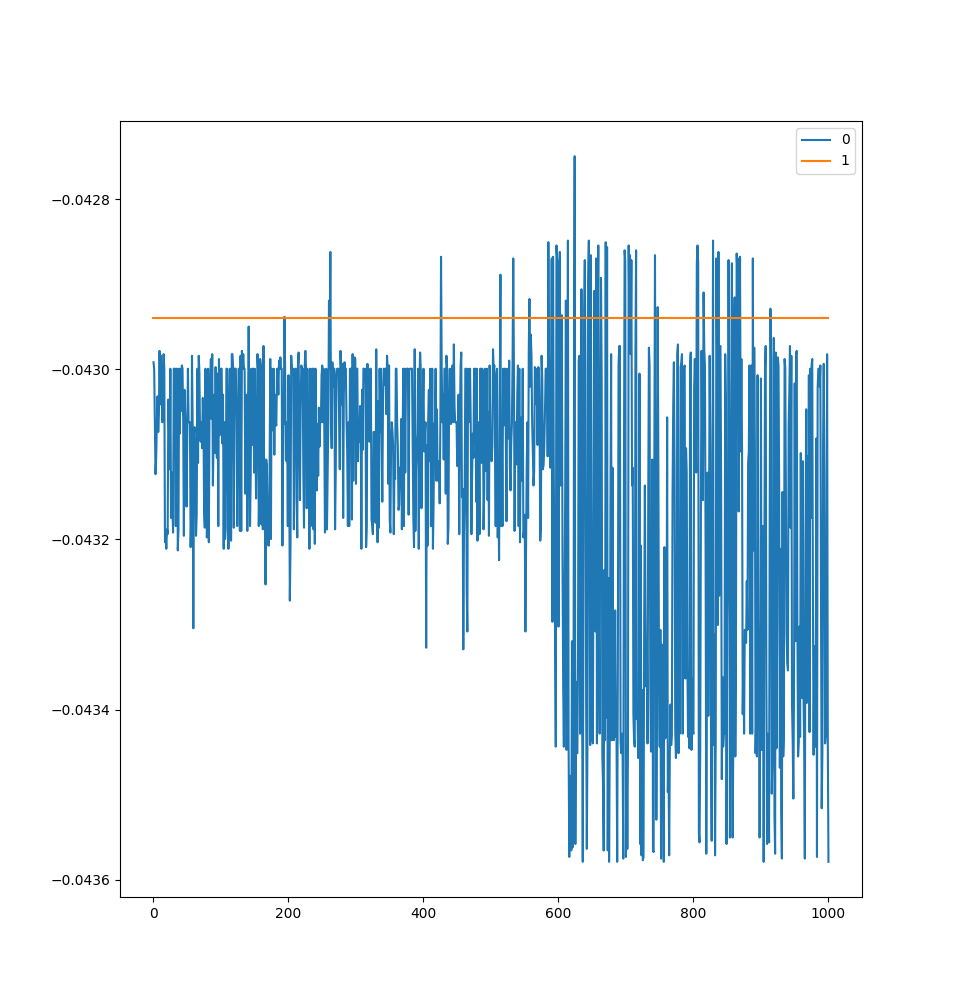
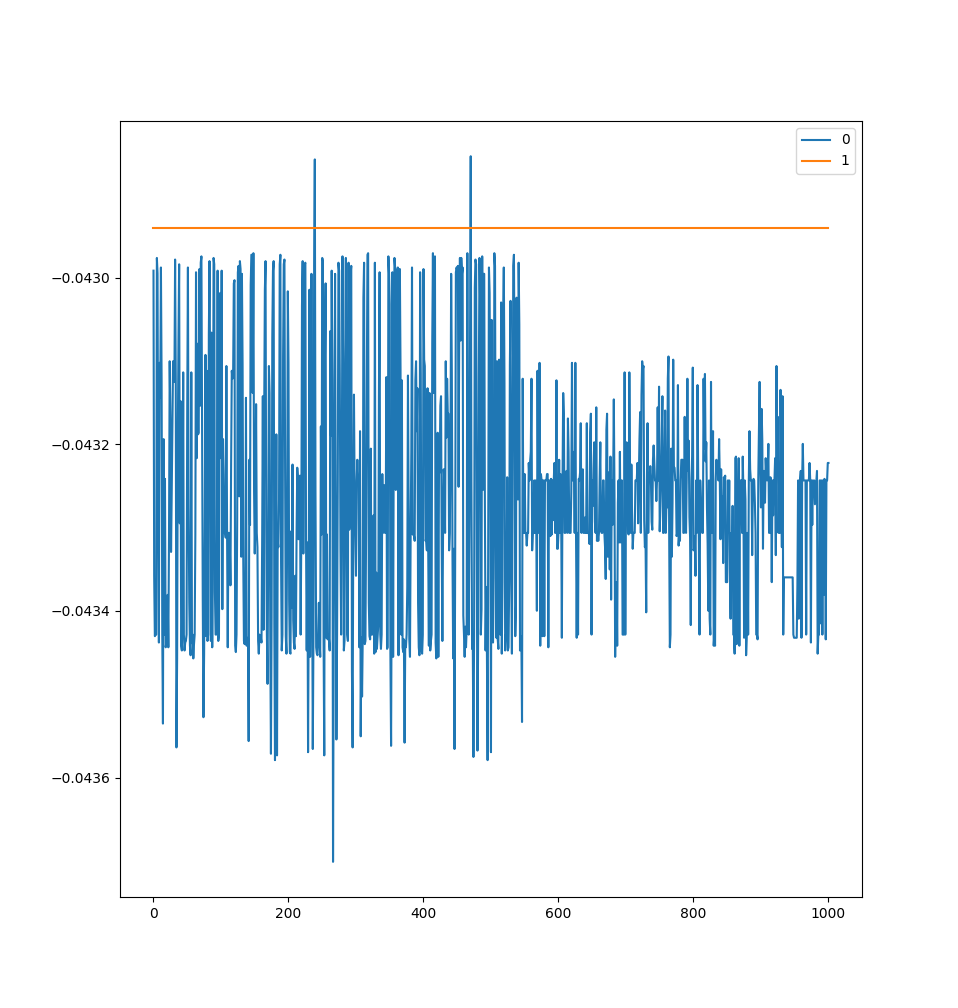
Final jitter after tuning position gain. - Set the velocity integrator gain and save the configuration. I set the “bandwidth” to be 10ms or 100Hz.
 # integrator gain = 0.5 * bandwidth * vel_gain
 odrv0.axis0.controller.config.vel_integrator_gain = 0.5 * 100 * odrv0.axis0.controller.config.vel_gain
 odrv0.save_configuration()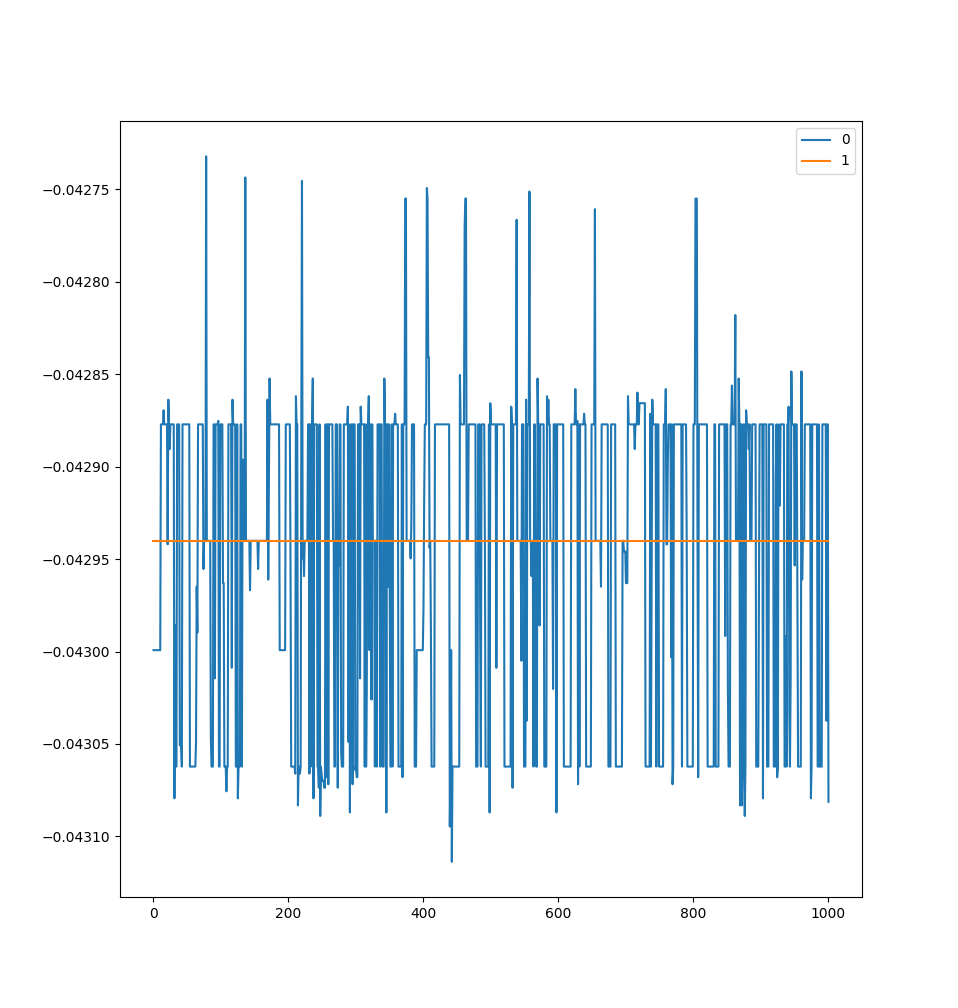
Final jitter when reintroducing velocity integrator.
My final gain values were the following:
- Position: 35.0
- Velocity: 0.14083333313465118
- Velocity Integrator: 7.041666507720947
You might be able to get more stable behavior by trying out different bandwidths.
Anticogging Calibration
This part isn’t very robust, but liveplotter is your friend here. Your motor might not look like it is moving, but the liveplotter shows when it makes it to the next step. I’ve found that the most successful calibration runs were from motors that were tuned to have very low jitter. Following the hidden anticogging guide.
odrv0.reboot()

odrv0.axis0.encoder.config.use_index = True
odrv0.axis0.requested_state = AXIS_STATE_FULL_CALIBRATION_SEQUENCE
odrv0.axis0.encoder.config.pre_calibrated = True
odrv0.axis0.motor.config.pre_calibrated = True

odrv0.axis0.controller.config.control_mode = CONTROL_MODE_POSITION_CONTROL
odrv0.axis0.controller.config.input_mode = INPUT_MODE_PASSTHROUGH
odrv0.axis0.requested_state = AXIS_STATE_CLOSED_LOOP_CONTROL

odrv0.axis0.controller.start_anticogging_calibration()

# Be patient, it's normal for it to get stuck in one or two areas.
# I waited around 5 minutes around 2/3 of a turn.
# If it get stuck a lot, consider tuning your motor to have lower jitter.
# The motor also needs decent gains to overcome the cogging force.
# Anticogging is done when the motor returns to position 0.
# You can also check if it is done with the following command

odrv0.axis0.controller.config.anticogging.calib_anticogging
# Finished when it returns False

odrv0.axis0.controller.config.anticogging.pre_calibrated = True
odrv0.save_configuration()
odrv0.reboot()
After setting the pre_calibrated bit, saving the configuration, and rebooting, your motor should operate with an anticogging correction factor. Congratulations!
Notes
-
Anticogging advice used to be to jack up position and velocity gain before running to make it more dependable. I DO NOT RECOMMEND THIS. The software has changed a bit and boosting the gains will cause the motor to vibrate. This will make it very difficult for the motor to complete the anticogging calibration procedure since it has trouble settling on a certain position. I recommend using the tuned values that have minimal jitter and maximum gain. When doing so, my motor got stuck at one position for a few minutes, but glided through everything else.
-
PJohnson mentioned on Discord that the tuning is very finicky and suggested that easing the position and velocity constraints could help. I didn’t need to do this, but I can see how it could be helpful. The parameters are
controller.config.anticogging.calib_pos_thresholdandcontroller.config.anticogging.calib_vel_threshold.
Leave a Comment
Comments are moderated. Email won't be published. All fields are required. *